
JotForm is a powerful online application that allows anyone to quickly create custom online forms. Its intuitive drag-and-drop user interface makes form building incredibly simple and doesn't require you to write a single line of code. You can easily add in payment options and also integrate your forms with other popular services including Mailchimp.
If you watched the video above, at 1:10 and 1:03 times, you can see a list of services the forms can integrate with, including Mailchimp.
Things Needed
You only need a few things
- A Payment Accepting Service
- A Custom Email Account >> How to get one for Free
- A Jotform Account
- A Form
- A Mailchimp Account
- A Mailchimp Newsletter List
- A Zapier Account {Just to assure triggers and add a few features because on Mailchimp, it is paid. (For Way 1)}
- Willing-To-Buy Readers >> How to Get more Page and Site Views
If you have enough traffic on your site and a few people who really love and appreciate your content, then you can get started.
TIP - If you are not sure if this tutorial is worth it or not, then feel free to scroll down to the bottom of the post to see my own subscription form.NOTE - The are 2 Ways to Complete this task. And also 1 extra integration.
WAY 1
With Mailchimp, Jotform, and any Payment Collecting Method.
STEP 1 - Payment Accepting System
There is not really much to it to this step, all you need is one account that can accept payments from any of the services in the list given in the picture. This is the only way for you to accept payments easily. Since I live in India, I was unable to make a Stripe account, but if I could, then there was a much easier way to get money for newsletter subscriptions. To find out more about this, Read Way 2, this will be available for reading later on this page.
TIP 1 - If you decide to use your Paypal account to collect payments, then make sure that it is a business or merchant account.
TIP 2 - Stripe is only available in a few countries, to find out more, go to > https://stripe.com/global
TIP 3 - Do not connect with Paypal directly from Mailchimp, To find out why, view the reviews on this link > https://connect.mailchimp.com/integrations/paypal
If you have purchased a domain name from services like Godaddy, then you probably already have a custom email address. A custom email address is required so you can easily send emails through View this Post.
NOTE - This thing is required in both way 1 and way 2.
STEP 3 - Get JotForm and MailChimp Accounts
Mailchimp
STEP 3 - Get JotForm and MailChimp Accounts
Mailchimp
I am sure that you already have a MailChimp account by now, but if you don't, then do not worry. Click here on the link > Mailchimp.com < and create an account. Though you should always remember that you will be able to access the BEST features possible with a paid feature, and if you access through the given link, then you can get $30 free in MonkeyRewards which will be used to pay for many other features in MailChimp.
NOTE - This thing is required in both way 1 and way 2.
When you viewed the list of things needed, I provided a link of 'Why is Jotform the Best Form Builder'. which compares many form builders. But there are a lot of other form builders out there which integrate with a lot of softwares like Paypal, Stripe, Mailchimp, etc., but still, the most trusted and most used worldwide is Jotform. Plus, I myself tested Jotform and have created quite a few forms with it and am sure it is Worth it. I have also given the video of why it's so awesome. All you have to do is go there and create an account. I am sure that you will become its fan.
STEP 4 - Creating a Mailchimp List Now, this must be the EASIEST thing that you will have to do.
If you already have a list that you want to work with then go ahead, but if you do not, then just follow these steps
- Log on to your Mailchimp account.
- Navigate to LISTS from the top bar.
- Click the Create List button located on the top-right of the page.
- Enter the details required.
- Click Save
- Done!
You have created your list and are now ready to move on to the next step.
NOTE - This thing is required in both way 1 and way 2.
STEP 5 - Creating your Personalized Form This is the most fun thing to do. It's when you can test your creativity skills, just like you do while blogging.
- Login to your Jotform Account.
- Click on Create Form
- Select either a blank form or use a template.
- Add a Title
- Add some basic information fields
- Select your method of payment through the Payment Fields drop-down menu.
- Add your information, products, price, and even coupons.
- Customize the size, colors, and even the CSS from the Designer in the top menu.
- Click Save
- Click Integrations from the top menu.
- Click on Mailchimp
- Enter your Mailchimp API key that can be found in MAILCHIMP > ACCOUNT & API KEY
- Click Authenticate and the click Complete Integration.
- Complete the rest of the customization
- Click Save again
- Click Publish from the Top menu
- Choose your method to add your form to your site.
- Watch the money roll in.
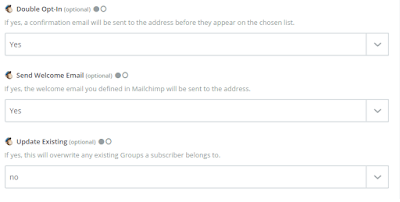
A Zapier account with not only help you in this task but will also help you to do many other things. By creating this account, you can assure that the Jotform submissions with add a new subscriber to your Mailchimp list. It will act as a double-check to make sure that your subscriber will be added, updated, removed or whatever, depending on how you want your ZAP to work.
The reason why I added this thing to the list is because It will allow you to perform another feature, which is to send Confirmation Email and a Welcome Email, which is a paid feature in MailChimp.
WAY 2
With Mailchimp, Campaignzee, and Stripe - This only works in a few countries.
(Copyright @ Mailchimp.com)
STEP 1 - Connect Your MailChimp Account
Campaignzee's integration will take your headache out of connecting your MailChimp account with payment portal, Stripe. With Campaignzee, you can create a simple signup form and accept credit card payments directly to your Stripe account. Campaignzee will also manage the recurring charges and list maintenance for you, automatically.
To get started connecting your accounts, click the "Sign In" button on the Campaignzee home page.
Campaignzee will send you over to the MailChimp OAuth2 page, where you can log in with your MailChimp username and password.

Campaignzee will send you over to the MailChimp OAuth2 page, where you can log in with your MailChimp username and password.

After logging in with your MailChimp username and password, you'll automatically be sent back to your Campaignzee dashboard where you can continue the setup process.
STEP 2 - Connect Your Stripe Account
If this is the first time setting up Campaignzee, you'll see a popup that will let you connect your Stripe account. Click the "Connect with Stripe" to log into Stripe and get your account connected.

If you haven't gone through the Stripe setup process, you may be prompted to fill out some additional information about your Stripe account before continuing. When you're ready, click the "Authorize Stripe" button.

Set Up Your List(s)
Now that you're connected to your MailChimp account and your Stripe account, you're ready to start charging for your list subscriptions. From your Campaignzee dashboard, click "Turn On Payments" for the list you want to use.

You'll then be prompted to fill out a short description of your list and set a price. With Campaignzee, you can charge between $5 and $200 per subscriber per month.

Once you click the "Turn On Payments" button, you should see a short success message with a link to your newly created, Stripe-powered signup form.

Visiting the URL will take you to your Campaignzee form which will allow subscribers to sign up and start their payment with Stripe.

Other Notes
It's worth mentioning that, currently, Campaignzee only grabs the email address from the subscriber. If there are additional fields that are required by your list(s), they will not be populated in the Campaignzee form, and subscriptions will fail. If you need to make adjustments to an existing list, you can mark fields as "required" or "notrequired" in your MailChimp list.
Campaignzee also manages failed payments, automatically. If a payment fails, Campaignzee and Stripe will try to charge the subscriber for up to three days. If the charge is still failing after 3 days, Campaignzee will automatically unsubscribe them from your MailChimp list.
Comments
Post a Comment