When we buy laptop or desktop computers, usually the computer comes with a single disk partition that is accessible from "My Computer" that is usually labelled "C". Yes, there could be some hidden partitions on the hard disk such as the "Recovery Partition" and some manufacturer specific partitions for system recovery and tools etc. A user would normally like to have at least two partitions on the computer to manage personal files separate from the Windows partition. So, if your computer came with a single accessible partition, how to create more partitions?
What is hard disk partitioning?
Hard disk partitioning as the name indicates is the process of dividing a hard disk into partitions or logical disks on the same physical hard disk and treat each partition as a separate disk. That's right! Each of the partitions on the hard drive is treated by the computer as if they were different physical disk with it's own label.
Why to partition an hard disk?
Some common reasons and advantages of hard disk partition:
How to partition a hard disk on Windows?What is hard disk partitioning?
Hard disk partitioning as the name indicates is the process of dividing a hard disk into partitions or logical disks on the same physical hard disk and treat each partition as a separate disk. That's right! Each of the partitions on the hard drive is treated by the computer as if they were different physical disk with it's own label.
Why to partition an hard disk?
Some common reasons and advantages of hard disk partition:
- To manage personal file separate from the Windows partition. Organizing personal files separate from the Windows files is much organized.
- Formatting and OS Re-installation convenience: In the event of a computer crash, Windows may need to be re-installed. You can re-install Windows on the existing Windows partition without affecting files on the other partitions, thus saving your personal files on the other partition.
- Disk partitioning could also improve computer performance slightly. Hard disks usually works better on smaller chunks instead of one big chuck. Due to reduced disk head re-positioning delays, there could be improved performance.
- and may be some more advantages.
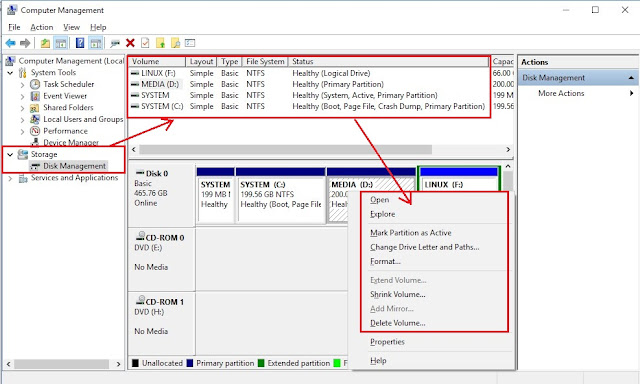
Windows OS usually comes with a disk management tool called, yes, "Disk Management" which can be used to easily create new partitions, extend volume, shrink volume, delete volume (partition). There is no need to download additional disk partitioning tool for creating extra disk partitions on Windows.
To access the "Disk Management" tool on Windows, do the following:
- Open "Control Panel\All Control Panel Items\Administrative Tools"
- Double Click on "Computer Management"
- In the new window, click on "Disk Management" on the left sidebar
 | ||
| Disk Management Tool in Windows |
Watch this short demo video how to create disk partitions on Windows and delete disk partitions using Windows' Disk Management tool.
Shrink Volume:
To shrink a volume means to reduce the size of the existing disk partition by specified amount of space.
To create a new partition on an existing partition, select "Shrink Volume". We would then need to specify the amount of space (in MB) to shrink the existing partition by. To convert a GB to MB, multiply the total amount of GB by 1024. Suppose, to shrink C DRIVE of 900 GB to create another partition of 200GB, shrink the C DRIVE by 200GB * 1024 = 2,04,800 MB.
Note: If the C DRIVE total space is 900 GB and out of which 800GB is already occupied, which means there is only 100GB free on the C DRIVE, then Windows cannot shrink the C DRIVE by 200 GB. In that case, we would need to backup or move files from the C DRIVE to make space for the shrink.
Extend Volume:
To extend a volume means to increase the size of disk partition by certain amount of space.

Comments
Post a Comment